

We all have those days where we feel like working out, but we don’t feel like leaving the comforts of our own home. Been there, done that. It’s these kinds of days where I’d search for at-home workouts, like a yoga mat workout.
Fortunately, these workouts are readily available, requiring nothing more than a yoga mat and some floor space. Selecting the right workout mat is crucial for various exercises, as it enhances performance, prevents injuries, and provides comfort. What could be a more convenient way to incorporate daily exercise into your routine? So, if you are ready, here are 10 easy workouts that you can do with just a yoga mat to build strength!
Key Takeaways
- Yoga mat workouts are not only easy to do, they are also convenient and can be done at home.
- A Yoga mat offers some good benefits like joint protection, stability and helps to properly align the body.
- There is a wide range of exercises that you can do with just a yoga mat. Here you will find 10 yoga mat workout exercises that are easy and effective.
- If you want to better perform exercises on a yoga mat, you should follow a few tips like warming up, starting slow, breathing and ensuring that you have proper form.
- Yoga mats are not the same as exercise mats. Yoga mats are thinner than exercise mats and they better serve low-impact exercises.
Discover more exercises for physical and mental health:
A Beginner’s Guide to Somatic Workout
The Best Somatic Exercises for Mental and Physical Well-Being
10 Yoga Mat Workouts
Now that you know the benefits of using a yoga mat, I’m sure you would be eager to know what yoga mat workout you can do with one. Therefore, below is a list of some common yet effective exercises that you can easily do. No fancy gym equipment required.
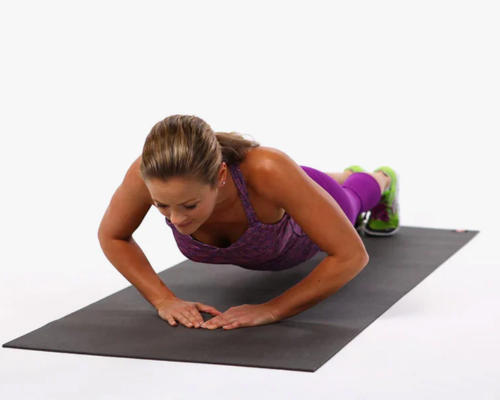
1. Plank
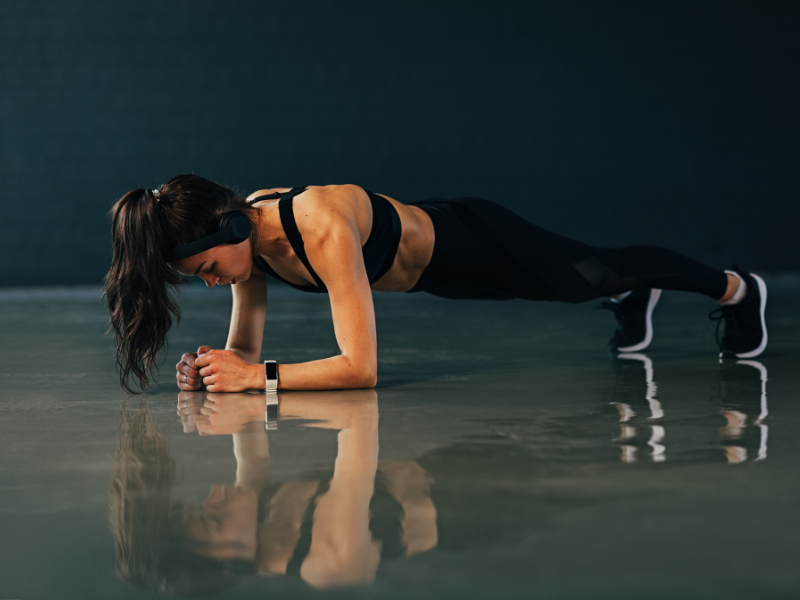
How to do it:
- Begin by getting into a plank pose, with your hands directly under your shoulders and your body forming a straight line from your head to your heels. Proper form and core engagement are crucial.
- Tighten your abdominal muscles and squeeze your glutes in order to stabilize your body.
- Keep your head in line with your spine as you look down at the floor to avoid straining your neck. Ensure your hips aren’t sagging or raised too high.
- Hold this plank position for as long as you can while maintaining proper form. As a start, you should aim to hold for about 20 to 30 seconds.
- As you are do this exercise, you want to focus on your breathing. Inhale deeply through your nose and exhale through your mouth. You shouldn’t be holding your breath at any point.
- Once you’ve held the position as long as you can, gently lower yourself back down to starting position.
- Repeat as desired.
2. Glute Bridges
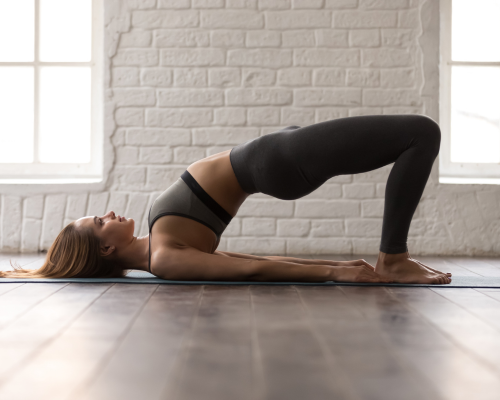
How to do it:
- Start by lying on your back with knees bent and feet flat on the floor. You should have your knees hip-width apart and your arms resting by your sides with palms facing down.
- Tighten your abdominal muscles to stabilize your spine and pelvis throughout this exercise.
- Press through your heels. Keep your glutes engaged as you squeeze it, lifting your hips off the floor until your body forms a straight line from your shoulders to your knees.
- You want to ensure that you are pushing your hips upward but not arching your back.
- At the top of the movement, pause briefly and squeeze your glutes tightly.
- Slowly lower your hips back down to the starting position while maintaining control. Avoid dropping your hips too quickly.
- Repeat this movement according to your desired number of repetitions.
3. Crunches
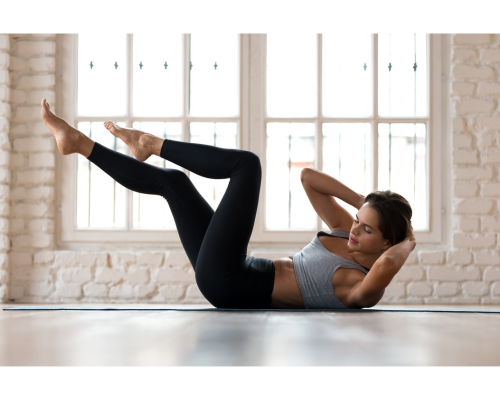
How to do it:
- Start by lying on your back with knees bent and feet flat on the floor. You should have your knees hip-width apart. You can place your hands behind your head or across your chest, whichever is more comfortable.
- Contract your abdominal muscles to stabilize your spine and pelvis throughout the exercise. Avoid pulling on your neck or using your hands to lift your head.
- Exhale as you gently lift your shoulder blades off the floor, keeping your neck relaxed and chin slightly tucked. Focus on using your abdominal muscles to initiate the movement rather than relying on momentum.
- At the top of the movement, pause briefly and squeeze your abdominal muscles to maximize contraction.
- Inhale as you slowly lower your upper body back down to the starting position. Maintain control and tension in your abs as you lower yourself back down.
- Repeat this movement as many times as you desire.
Other variations of this exercise include side crunches, v crunches, and vertical leg crunches.
4. Mountain Climbers
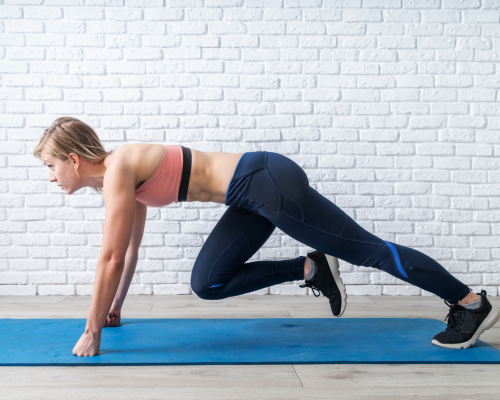
How to do it:
- Start by getting into a high plank position with your hands placed shoulder width apart directly under your shoulders and your body forming a straight line from your head to your heels.
- Brace your core muscles to stabilize your spine. As you brace your core, lift your right foot off the ground and bring your right knee up towards your chest. Bring your right leg back to the starting position as you switch over to your left leg.
- You should be alternating each leg in a swift and fluid motion. Imagine as if you are running in place but horizontally. Keep a steady pace, making sure that your hips do not drop.
- Coordinate your breathing with your movements, exhaling as you drive your knee towards your chest and inhaling as you return your leg to the starting plank position.
- Aim to do at least 30 to 45 seconds per set.
Explore more yoga exercises:
The Ultimate Guide to Somatic Yoga and its Exercises
5. Diamond Push Ups
How to do it:
- In a plank position, place your hands together directly under your chest and form a diamond shape with your index fingers and thumbs. You should also ensure that your body forms a straight line from your head to your heels.
- Engaging your core muscles, bend your elbows as you lower your chest. Try to lower your chest as close as possible, towards your hands. Keep your elbows close to your sides as you lower yourself down.
- Once your chest is near your hands, press through your palms to straighten your arms back and return to the starting position.
- Exhale as you push yourself up and inhale as you lower down, maintaining a steady rhythm of breathing throughout the exercise.
- Repeat this movement as many times as you desire.
6. Bird Dog
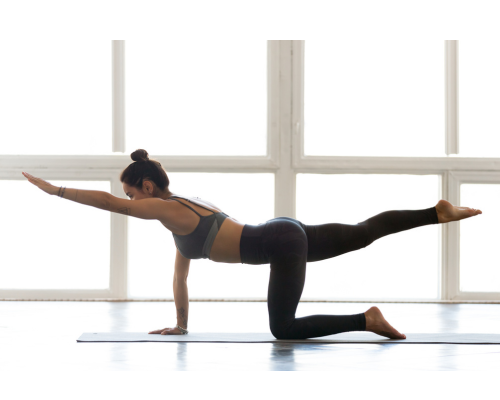
How to do it:
- Start by getting on all fours in tabletop position. Your head and spine should be aligned as you look towards the ground.
- Brace your core muscles so as to stabilize your spine and pelvis throughout the exercise. This will help you to prevent excessive arching or rounding of the back.
- You want to extend your right arm straight out in front of you and at the same time, extend your left leg straight back behind you. Ensure that both limbs are parallel to the floor and hips are leveled, keeping the leg straight to maintain balance and proper form.
- Hold this position briefly. You should be focusing on reaching your arm and leg away from each other to lengthen your body.
- Then, slowly lower your arm and leg back to the starting position. Repeat this movement with your left arm and right leg.
- Continue alternating until you reach your desired number of repetitions.
7. Dead Bug
How to do it:
- Start with your back against the mat, on the floor. Extend your arms straight up towards the ceiling with your legs bent at a 90-degree angle. Your knees should be positioned directly over your hips.
- Bracing your core and keeping your lower back pressed into the mat, slowly lower your right arm towards the floor behind your head and simultaneously lower your left leg towards the floor. Your leg should be straight.
- Stop when your arm and leg are just above the floor. Then slowly return your limbs back to starting position. Each move should be slow and controlled.
- Repeat this on the other side, lowering your left arm and right leg this time.
- Continue alternating until you reach your desired number of repetitions.
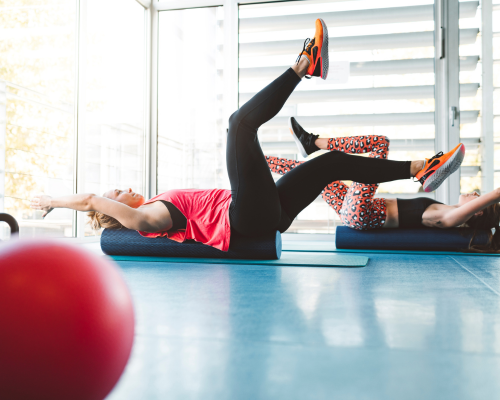
8. Leg Raises
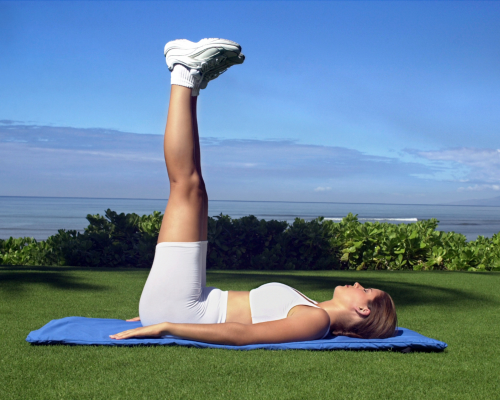
How to do it:
- Start by lying flat on your back on a mat with your arms by your sides and palms facing down. Keep your legs together and fully extended.
- Keeping your legs straight and together, slowly lift them off the ground until they are perpendicular to the floor. Alternatively, lift them as high as you can without straining your lower back.
- Ensure that you maintain control and avoid swinging your legs. Slowly lower your legs back down to starting position, making sure to slowly extend your legs to maximize engagement of your core muscles.
- Repeat this movement as many times as you desire.
9. Cat-Cow
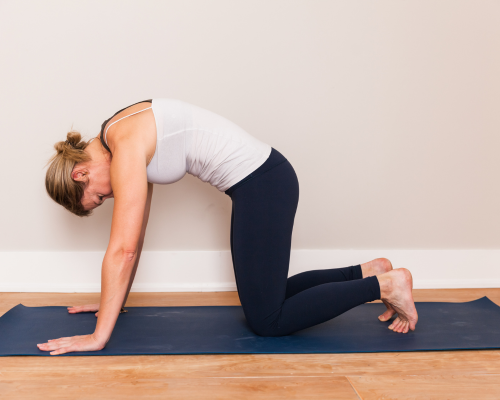
How to do it:
- Start by getting into all fours with your wrists directly beneath your shoulders and your knees beneath your hips. Your spine should be in a neutral position and your gaze should be down.
- Arch your back upwards towards the ceiling. Your pelvis should tip forward, tucking your tailbone in.
- Imagine that you are pulling your belly button towards your spine. This is the “cat” position.
- Exhale as you reverse the movement, allowing your back to press downwards towards the floor. Sink your belly towards the ground.
- Lift your head and chest up towards the ceiling as you arch your lower back and tilt your pelvis upwards. This is the “cow” position.
- You should be flow between each movement. Inhale as you move into the cat stretch, and exhale as you move into the cow stretch.
- Repeat this movement until you reach your desired number of repetitions.
10. Superman
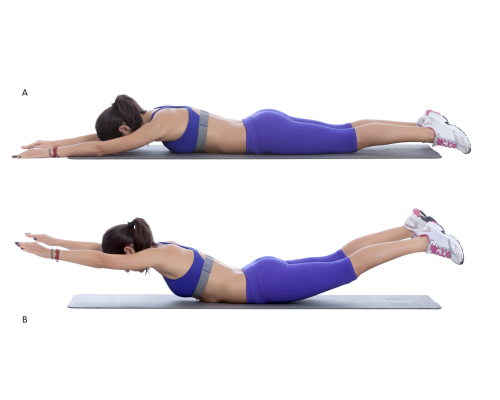
How to do it:
- Start by lying face down on a mat. Your arms should extend past your head and your legs straight. Ensure that your palms are facing down and your toes are pointed.
- Inhale as you simultaneously lift your arms, chest, and legs off the ground. Keep your gaze down to maintain a neutral neck position.
- Your arms and legs should be fully extended, with only your pelvis remaining in contact with the mat.
- Hold the lifted position for a few seconds, focus on squeezing your glutes and engaging your lower back muscles.
- Exhale as you gently lower your arms, chest, and legs back down to the starting position. Take care to control the movement and avoid dropping your limbs abruptly.
- Repeat this movement until you reach your desired number of repetitions.
Benefits of Using a Yoga Mat for Workouts
Regardless of what kind of workouts you do at home, using a yoga mat is always a good addition. This is especially so if you have exercises that will require you to lie on the floor or test your balance. A yoga mat can help to protect the joints, provide you with stability and it also helps to maintain proper alignment [1].
Joint protection
As the yoga mat has cushioning, it offers protection for your joints. If you have tried doing exercises like push-ups or planks which require you to place a lot of weight on your wrist, elbows, or knees, you will notice that it may be painful afterward.
A yoga mat helps to alleviate the strain that comes with doing these exercises, allowing you to better perform.
Provides stability
This is one of the key benefits of using a yoga mat. You get to experience stability from the cushioning which is very much needed as you perform floor exercises or stretches [2].
Helps to maintain proper alignment
The surface of a yoga mat provides traction and grip, preventing slipping and sliding during poses or movements. This stability enables you to focus on your form and alignment and ensure that your body is positioned correctly to maximize the benefits of each posture.
Difference Between Yoga Mat and Exercise Mat
For some of us, there is this problem of not having a yoga mat but only an exercise mat and thinking that it works the same. However, what people don’t realize is that there is a difference between yoga mats and exercise mats.
Yoga mats are specifically designed for low-impact exercises while exercise mats are designed for more general exercises (gymnastics, gym, martial arts). Exercise mats are much thicker than yoga mats and they are more suited for higher-intensity exercises [3].
When deciding between the use of a yoga mat or an exercise mat, you should take the type of exercise that you are doing, into consideration.
3 Low-Intensity Yoga Mat Workouts
If you’re in search of other low intensity exercises that you can do using a yoga mat, check out the videos below:
Bodyweight exercises are highly effective in achieving fitness goals without the need for heavy weights or expensive equipment.
1. Total Body Blitz Workout
This workout includes a combination of cardio and strength exercises for a dynamic warm up.
2. Move and Sculpt Workout for Beginners
For building lean muscles and a toned physique, this workout is perfect to try out.
3. Total Body Burn Easy Workout
A simple routine that fires up the whole body, this routine focuses on overall fitness with strength training, endurance, and cardio exercises.
Other Resources
If you liked these workouts, don’t forget to check out our other yoga-related articles!
How To Do the Yoga Push-Up Effectively
Tips for Better Performance
To better perform during these exercises, ensure that you are following these few tips.
Warm Up
Warm ups are especially important before starting any exercise. They help to increase blood flow and stretch out the muscles for increased flexibility. This ensures that you do not end up straining the muscles and injure yourself while exercising.
Start Slow
Whenever you start a new workout, you always want to start off slow. People often make the mistake of rushing into a new workout too quick which leads to overexertion and injuries. Starting off slow gives your body time to adjust and you will be able to develop proper techniques.
Proper Form and Techniques
Speaking of techniques, you should never compromise on your form and technique while working out. Having bad form or technique could potentially lead to wrong muscle engagement or injury. 1 good repetition is better than 10 bad repetitions.
Focus on Breathing
Breathing is also an important aspect while working out. Pay attention to your breathing patterns and ensure that you are not holding your breath at any point in time. Proper breathing can enhance oxygen delivery to your muscles and improve endurance.
Summary
In conclusion, you don’t have to go to the gym just to get your workout in. There are always other alternatives that will save you the trouble of leaving your home. One alternative is a yoga mat workout. It is simple, effective, and can be done at your convenience. If you’d like more exercises with a yoga mat, don’t forget to check out our JustFit app for free!
Can I work out on a yoga mat?
Are yoga mats good for ab workouts?
Are mat exercises effective?
What thickness yoga mat for working out?
Graves, W. (2021, May 10). Exercise mat vs yoga mat: Is there a difference?. Fabrication Enterprises [online]. Available at:https://www.fab-ent.com/exercise-mat-vs-yoga-mat-is-there-a-difference/#:~:text=Yoga%20mats%20made%20with%20PVC,feel%20close%20to%20the%20ground.
Gripkart (2021) Benefits of a Good Yoga Mat [online]. Available at: https://medium.com/@gripkart/benefits-of-a-good-yoga-mat-122d6c8e067d
Yoga mats with alignment markers: Helpful or distracting?. Kati Kaia. (2022, August 14). [online]. Available at: https://www.katikaia.com/blogs/viceblog/yoga-mats-with-alignment-markers-helpful-or-distracting#:~:text=Here%20are%20some%20of%20the,proper%20alignment%20during%20yoga%20poses.


