
When it comes to losing stubborn body fat, we always focus on the fat in our bellies or limbs but often neglect to burn back fat. But have you ever noticed that back fat could affect your visual impression in the eyes of others? In addition, if you want to wear clothes that show off your collarbone or your shoulder blades and back, you should start working on your back.
This article provides you with more detailed back fat exercises without equipment so that you can accomplish your goals just at home.
Key Takeaways
- Back fat can impact your visual impression and be a factor in the perception of others, especially when wearing clothes that expose the back area.
- Factors contributing to back fat include poor diet, lack of exercise, genetics, and age.
- Excess back fat, like excess body fat in general, can increase the risk of health issues such as cardiovascular disease, type 2 diabetes, joint pain, sleep apnea, and inflammation.
- Engaging in back fat exercises not only targets fat reduction but also offers benefits like improved posture, increased strength, enhanced stability, and injury prevention.
- Consistent focus on a healthy diet, regular exercise, and overall body weight loss through a combination of diet and exercise is vital in reducing back fat.
What causes back fat?
Back fat can be caused by a variety of factors, including:
- Poor Diet: Consuming a diet high in unhealthy fats, sugars, and processed foods can contribute to weight gain and the accumulation of fat in various areas of the body, including the back.
- Lack of Exercise: Lack of physical activity can lead to weight gain and fat accumulation, including in the back region.
- Genetics: Genetic factors can play a role in where your body tends to store fat. Some individuals may be more prone to storing fat in the back area.
- Age: As we age, our metabolism slows down and muscle mass tends to decrease, making it easier to gain weight and harder to lose excess fat, including back fat.
Combating back fat typically involves a combination of a healthy diet and regular exercise. Overall body weight and loss through a combination of diet and exercise is key to reducing back fat.
Is back fat unhealthy?
Excess back fat, like how much body fat is in any other part of the body, can increase the risk of health problems. While some fat storage is normal and necessary for bodily functions, excessive back fat, can be a risk factor for conditions such as:
- Cardiovascular Disease: Excess body fat, especially around the back, is associated with an increased risk of heart disease, high blood pressure, and high cholesterol levels.
- Type 2 Diabetes: Having too much body fat, particularly visceral fat around organs, can contribute to insulin resistance and increase the risk of developing type 2 diabetes.
- Joint Pain: Carrying excess weight, including back fat, can put strain on the joints and lead to pain, especially in the back, hips, and knees.
- Sleep Apnea: Obesity, which can be indicated by the presence of back fat, is a risk factor for sleep apnea, a condition characterized by interrupted breathing during sleep.
- Increased Inflammation: Excess body fat, particularly visceral fat, can promote inflammation in the body, which is linked to various chronic diseases.
Therefore, back fat can pose health risks. It is often associated with overall excess body fat. This type of fat can surround internal organs and increase the risk of health conditions such as heart disease, diabetes, and high blood pressure.
Benefits of back fat exercises
Engaging in back fat exercises offers a wide range of benefits beyond simply reducing fat in the back area. Here are some key advantages of incorporating these exercises into your fitness and exercise routine are:
- Fat Loss: One of the major benefits of back fat exercises is, of course, the reduction of excess fat in the back region. By targeting the muscles in the back through specific exercises, you can help to decrease the overall fat percentage in that area, leading to a more toned and defined back appearance.
- Improved Posture: Strengthening the muscles in the back can significantly improve your posture. A strong back helps support the spine, reducing the risk of slouching or rounded shoulders.
- Increased Strength: Back fat exercises often engage a variety of muscles in the back, core, and arms. Regularly performing these exercises can lead to increased strength in these muscle groups, enhancing overall physical performance and functional fitness.
- Enhanced Stability: Many back fat exercises involve stabilizing the core and engaging the back muscles to maintain proper form. Over time, this can improve your overall stability and balance, contributing to better performance in daily activities and sports.
- Injury Prevention: Strengthening the muscles in the back not only helps reduce back fat but also plays a crucial role in injury prevention. A strong back can provide better support for the spine and reduce the risk of strain or injury.
By reaping these benefits of back fat exercises, you can not only attack back fat but also improve your fitness level, health, and quality of life. Consistency and proper form are key to maximizing these advantages and achieving your fitness goals.
6 Best Back Fat Exercises
If you’re struggling with back fat, you’re not alone. Many of us deal with it, but there are exercises tailored just for you. These moves focus on toning your back muscles, helping you shed unwanted fat and feel stronger. Here are 6 effective exercises to get rid of back fat:
1. Bridges
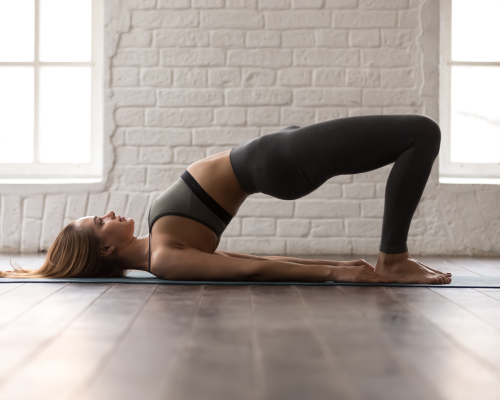
The glute bridge exercise will exercise the buttocks, legs, and other muscles, so that the muscles of these parts become tighter, but also will accelerate the burning of fat in these parts, and ultimately achieve the role of weight loss.
- Begin by lying on your back, with your knees bent and your feet flat on the floor, spaced apart at the width of your hips.
- Activate your core muscles and glutes, then raise your hips off the ground until your body forms a straight line from shoulders to knees.
- Maintain the bridge pose for a few seconds, focusing on contracting your glutes.
- Gradually lower your hips to return to the initial position and repeat the exercise for the preferred number of reps.
In the activation process, eyes have been looking upward, feet shoulder width, and the palms of the feet do not leave the ground. At the beginning and end of the action, feel the contraction of the hip muscles. Do not do the glute bridge when the calf is perpendicular to the ground, but placed at a slightly farther distance. It is best to keep the knee joint at about 90 °.
There are also variations of bridges to strengthen other parts such as glutes. If you are interested, see this video.
2. Push-up
Push-ups are self-weight training, so it does not require the use of any fitness equipment. As long as we have time, you can do it at any time and anywhere. It is a test of arm strength, before doing this action, we can start with the most basic upward slant push-ups, so slowly transition, perhaps you will be more to accept. Yoga push-ups are a great alternative for those with weaker arms. Ring push-ups are a more challenging version.
- Begin by assuming a plank position, with your hands positioned slightly wider than the width of your shoulders.
- Lower your body towards the ground by bending your elbows while keeping your body in a straight line.
- Push back up to the starting position by extending your arms.
- Repeat for the desired number of reps, focusing on maintaining proper body alignment throughout the movement.
3. Pull-up
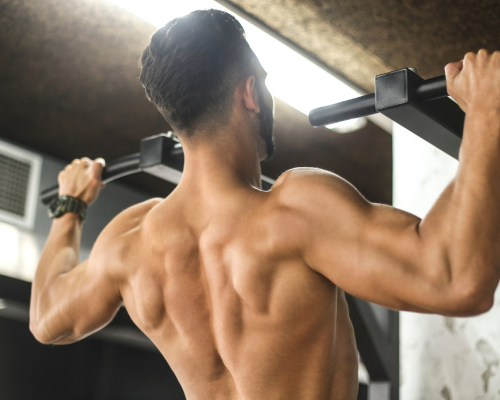
When doing pull-ups, you need to force flex your arms to pull up until your jaw is properly over the bar or the back of your neck is close to the bar. The pull-ups can not only exercise our back muscles and upper arm muscles but also shoulder muscles. For fat people, pull-ups are a great way to build muscle on one hand and lose fat on the other. The pull-up training will also consume some calories and promote fat burning.
- Grasp a pull-up bar with your hands positioned slightly wider than shoulder-width apart, palms facing outward.
- Hang from the bar with fully extended arms.
- Pull yourself up by engaging your back muscles until your chin clears the bar.
- Slowly lower yourself back down to the starting position with control.
- Repeat for the desired number of reps, ensuring full range of motion.
It should be noted that warm-up exercises are needed before doing pull-ups, which can well prevent muscle strains. When you do pull-ups to train your muscles, it is best to choose to do them once every two or three days, which can help the muscles recover faster.
Pull-up tips:
- It is best to do warm-up exercises before doing pull-ups, which can well prevent muscle strains. And also do some stretching after the exercise, which can play a role in relaxing the muscles.
- When you do pull-ups to train your muscles, it is best to choose to do them once every two or three days, which can help the muscles recover faster.
- Breathing method: inhale when the body is pulled up, exhale when it drops down.
4. Cat Stretch
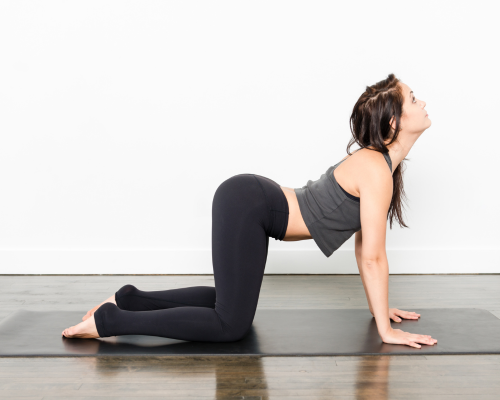
The cat stretch is one of the common yoga poses and back fat exercises without equipment that can relax our back and relieve back pain, especially for stretching and relaxing after a back workout.
- Begin on your hands and knees in a tabletop position with a neutral spine.
- Inhale and arch your back towards the ceiling, tucking your chin to your chest like a cat stretching.
- Exhale and return to a neutral spine position.
- Repeat this fluid movement, alternating between arching and rounding your back.
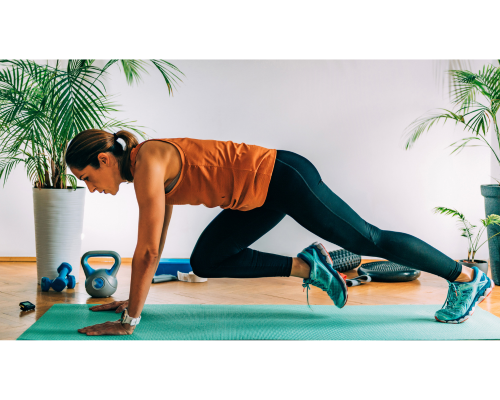
5. Bird Dog
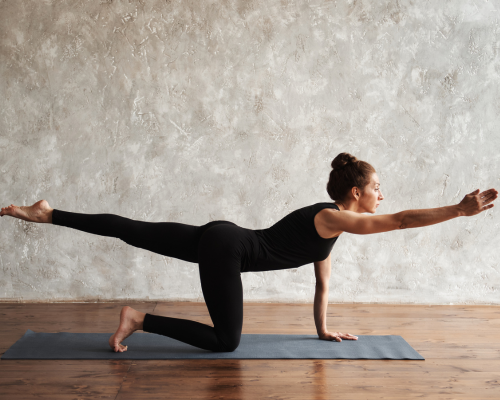
The focus of this movement in Bird Dog Pose is not on the movement of the limbs, but on your core stability as well as control. Its main point is to stress that the body should maintain a stable and neutral spine during the movement of the hip and shoulder joints and that the lower back should not moving.
- Start on your hands and knees with wrists under shoulders and knees under hips.
- Extend your right arm forward and left leg back, keeping them parallel to the floor.
- Engage your core to maintain balance and stability.
- Hold for a few seconds, then return to the starting position.
- Switch sides and repeat the movement with the left arm and right leg.
Don’t lift your arms or legs too much with the intention. Don’t lift your arms and legs too much upwards. Tuck in slightly and don’t lift or lower your head. You need to keep the spine properly aligned at all times and without a hint of movement!
Tips:
- Use abdominal breathing, and tighten your core muscles to stabilize the spine.
- Don’t lift your arms or legs too much with the intention. Don’t lift your arms and legs too much upwards.
- Tuck in slightly and don’t lift or lower your head.
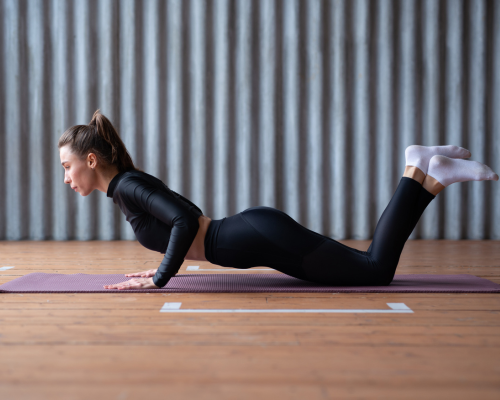
6. Superman
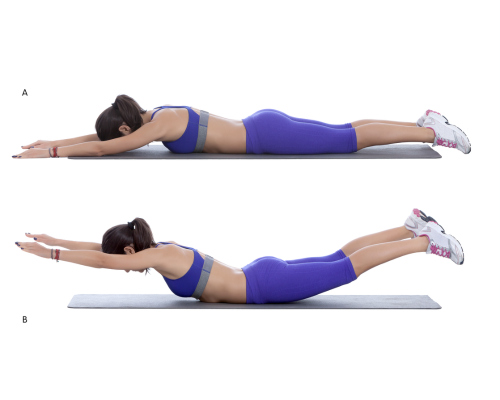
Lie prone on the floor or gym mat with your body straight and face down. Arms should be fully extended in front of you. This is the starting position of the movement.
- Lie face down on the floor with arms extended overhead and legs straight.
- Engage your back muscles and lift your arms, chest, and legs off the ground simultaneously.
- Hold the lifted position briefly, focusing on squeezing your back muscles.
- Lower back down with control and repeat for the desired number of repetitions.
This movement can also be done with one arm and one leg. You can lift the left arm, left leg, and left side of your body composition of the chest. Same for the right side.
8 Healthy diet tips to get rid of back fat safely
To support losing back fat, you should focus on a balanced and healthy diet while maintaining a calorie deficit. Here are some nutrition tips that can help with losing fat back:
1. Calorie control
Ensure you’re consuming fewer calories than you burn to create a calorie deficit. This can be achieved by tracking your daily calorie intake and adjusting portion sizes or food choices accordingly. Here are some delicious low-carb breakfast ideas.
2. Whole, unprocessed foods
Choose whole and unprocessed foods that are nutrient-dense and lower in calories. Include a variety of fruits, vegetables, lean proteins, whole grains, and healthy fats in your meals. Those nutrient dense foods can help you lose fat.
3. Portion control
Be mindful of portion sizes and avoid overeating. Use smaller plates or bowls to help control portion sizes visually.
4. Reduced refined carbs and added sugars
Minimize your consumption of refined carbohydrates (white bread, white rice, sugary snacks) and foods high in added sugars. These can contribute to weight gain and hinder your progress in losing back fat. To start, you can test a no sugar diet.
5. Hydration
Drink plenty of water throughout the day. Staying hydrated can help control hunger, support digestion, and promote overall health.
6. Healthy Snacks
Be prepared with healthy snack options to avoid reaching for unhealthy choices when hunger strikes. Opt for snacks such as fruits, vegetables, nuts, or low-fat yogurt.
7. Mindful Eating
Practice mindful eating by focusing on the taste, texture, and satisfaction that each meal and snack provides. This can help prevent overeating and improve your relationship with food.
8. Balance Macronutrients
Ensure that your meals contain a balance of macronutrients. Include lean proteins, healthy fats, and complex carbohydrates in each meal to provide sustained energy and promote satiety.
Remember, it’s important to consult with a healthcare professional or a registered dietitian for personalized advice tailored to your specific needs and health goals. They can provide you with a comprehensive plan that takes into account your individual circumstances.
Use cardio exercise to burn back fat faster
Cardiovascular exercise is an effective way to burn calories and to lose body fat too, including the excess fat in the back area. Here are some types of cardio exercises that can help you burn fat faster:
Running

Running is a popular and effective form of cardio exercise. You can run outdoors or on a treadmill, adjusting the intensity and duration according to your fitness level.
Cycling

Whether you prefer indoor stationary bikes or outdoor cycling, this low-impact exercise engages large muscle groups in the legs and can help burn calories and fat.
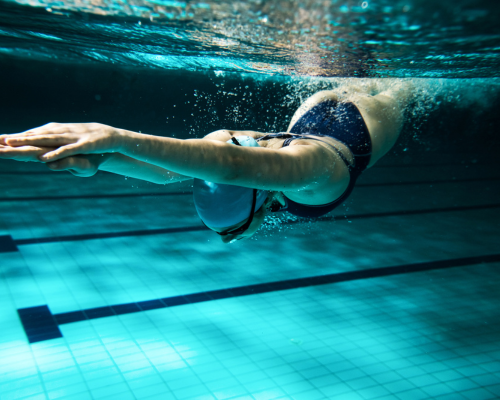
Swimming
Swimming is a full-body workout that not only helps burn calories but also provides resistance to build lean muscle. Different strokes, such as freestyle, backstroke, and butterfly, offer variety and challenge.
Jump Rope
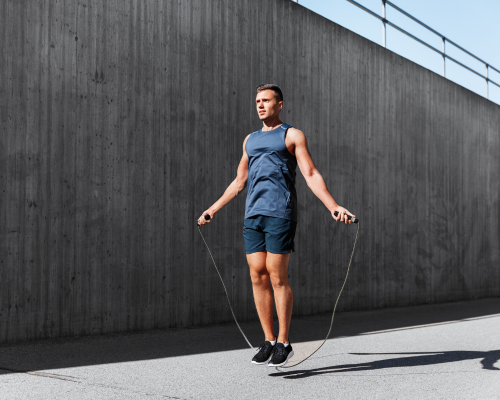
Jump rope is a simple yet effective cardio exercise that can be done anywhere with minimal equipment. It allows you to increase your heart rate and burn more calories more quickly.
High-Intensity Interval Training (HIIT)
HIIT involves alternating between short bursts of intense exercise and brief recovery periods. It can be done with various cardio exercises, such as running, cycling, or jumping jacks, and has been shown to effectively burn fat.
Remember that for effective fat burning, it is recommended to aim for at least 150 minutes of moderate-intensity aerobic activity or 75 minutes of vigorous-intensity aerobic activity per week, along with strength training exercises. Additionally, maintaining a balanced and healthy diet is essential for optimal fat loss and overall well-being.
Conclusion
To get rid of back fat, it’s important to understand what causes it, acknowledge the potential health risks, and start exercising. Alongside a balanced diet, incorporating back fat exercises and cardio can help you reach your fitness goals. For more exercises and personalized guidance, check out the JustFit app. Consistency and a holistic approach are key to long-term success in managing and reducing back fat.
FAQs
What is the best exercise to get rid of back fat?
The best exercises to target and reduce back fat involve a combination of cardiovascular exercise to burn overall body fat and strength training exercises to tone the muscles in the back. Calisthenic back workouts are also very efficient for back fat.
Why is back fat so hard to lose?
Back fat can be stubborn and difficult to lose due to several reasons. For instance, genetics play a significant role in how your body stores fat. Some people may naturally have a tendency to accumulate fat in the back. It may require extra effort and targeted exercises to reduce fat in these specific areas.
What causes back waist fat?
Back waist fat, also known as love handles or muffin top, can be caused by various factors such as excess calorie, unhealthy diet, lack of physical activity and age.
How can I slim down my upper back?
To slim down your upper back, it is important to focus on a combination of exercises that target the muscles in back and overall fat reduction. You can do rows, pull-ups, cat stretch, and bird dog. These exercises help you lose weight and strengthen and tone the muscles, giving your upper back a more defined appearance.
References
Rebecca Gillam and Bride Wilkins. (2024). How to get rid of back fat: 8 effective ‘back fat exercises’, causes + nutrition tips. Available at: https://www.womenshealthmag.com/uk/fitness/fat-loss/a29202869/how-to-get-rid-back-fat/ [Accessed 20 Mar 2024].
Joseph Summers. (2023). 10 Quick Easy Workouts To Get Rid Of Back Fat At Home. Available at: https://www.lifehack.org/384920/10-quick-easy-workouts-to-get-rid-of-back-fat-at-home [Accessed 20 Mar 2024].